If you aren't real familiar with all the different Rollei TLR models, and have spent a little time looking at them on ebay, you will likely find it rather confusing. I know that when I first started looking at Rolleiflex, I couldn't make heads or tails of it. Why was one camera selling for $300, and another that looked the same selling for $4000! Rolleiflex were made for nearly a century, and other than the very early models and some special models, they really didn't change in looks for the most part. Couple that with the fact that most Rolleiflex don't actually have any model number on them, and it can get quite confusing.
Before going to far, I just want to point out that this guide is meant as a general introduction to classic Rolleiflex, and is not meant to be a super accurate history of the cameras. Because of the nature of this article, I may generalize, or I may leave some details out. It is not my intention to misinform, and I apologize if I get some details incorrect.
Pricing -
The cost of a Rolleiflex can vary drastically, but in a general sense the newer the camera and the better the features, the more it will cost. A 1969 camera will usually cost more than a 1954 camera, and a 2.8 model will typically cost more than the same era 3.5 model, etc.
Models -
This is where a lot of the confusion comes from for people first learning about Rollei TLRs. I am not any kind of Rollei expert, but I have done some research into the cameras, and I own 3 Rolleiflex and have used more. I might get some facts wrong, but I will attempt to dispel some of the confusion. Also, to make things simpler, this write up will focus primarily on 6x6 Rolleiflex, and not the Rolleicord which is a similar but different camera, or the Tele and Wide models.
In general (this is how I think of it anyway), there are 4 main groups of Rolleiflex models:
The Rolleiflex Standard
The Automat
The 3.5
The 2.8
Originally, there was one 6x6 model called the Rolleiflex Standard, then in the late 30s, the Rolleiflex Automat was introduced. In the late 40s the first 2.8 was introduced, and in the mid 50s the Automat was replaced with what is generally referred to as the 3.5C or 3.5E. The 2.8 models basically follow an alphabetic progression (The 2.8A was replaced with the 2.8B, etc.), and in a way, after the 3.5C/E was introduced, they follow that progression. Franke and Heidecke went bankrupt in 1981 and was bought by a different company who restarted TLR production in 1987 with the 2.8GX. For many Rolleiflex aficionados, the last models of the 2.8F mark the end of the classic Rolleiflex TLR.
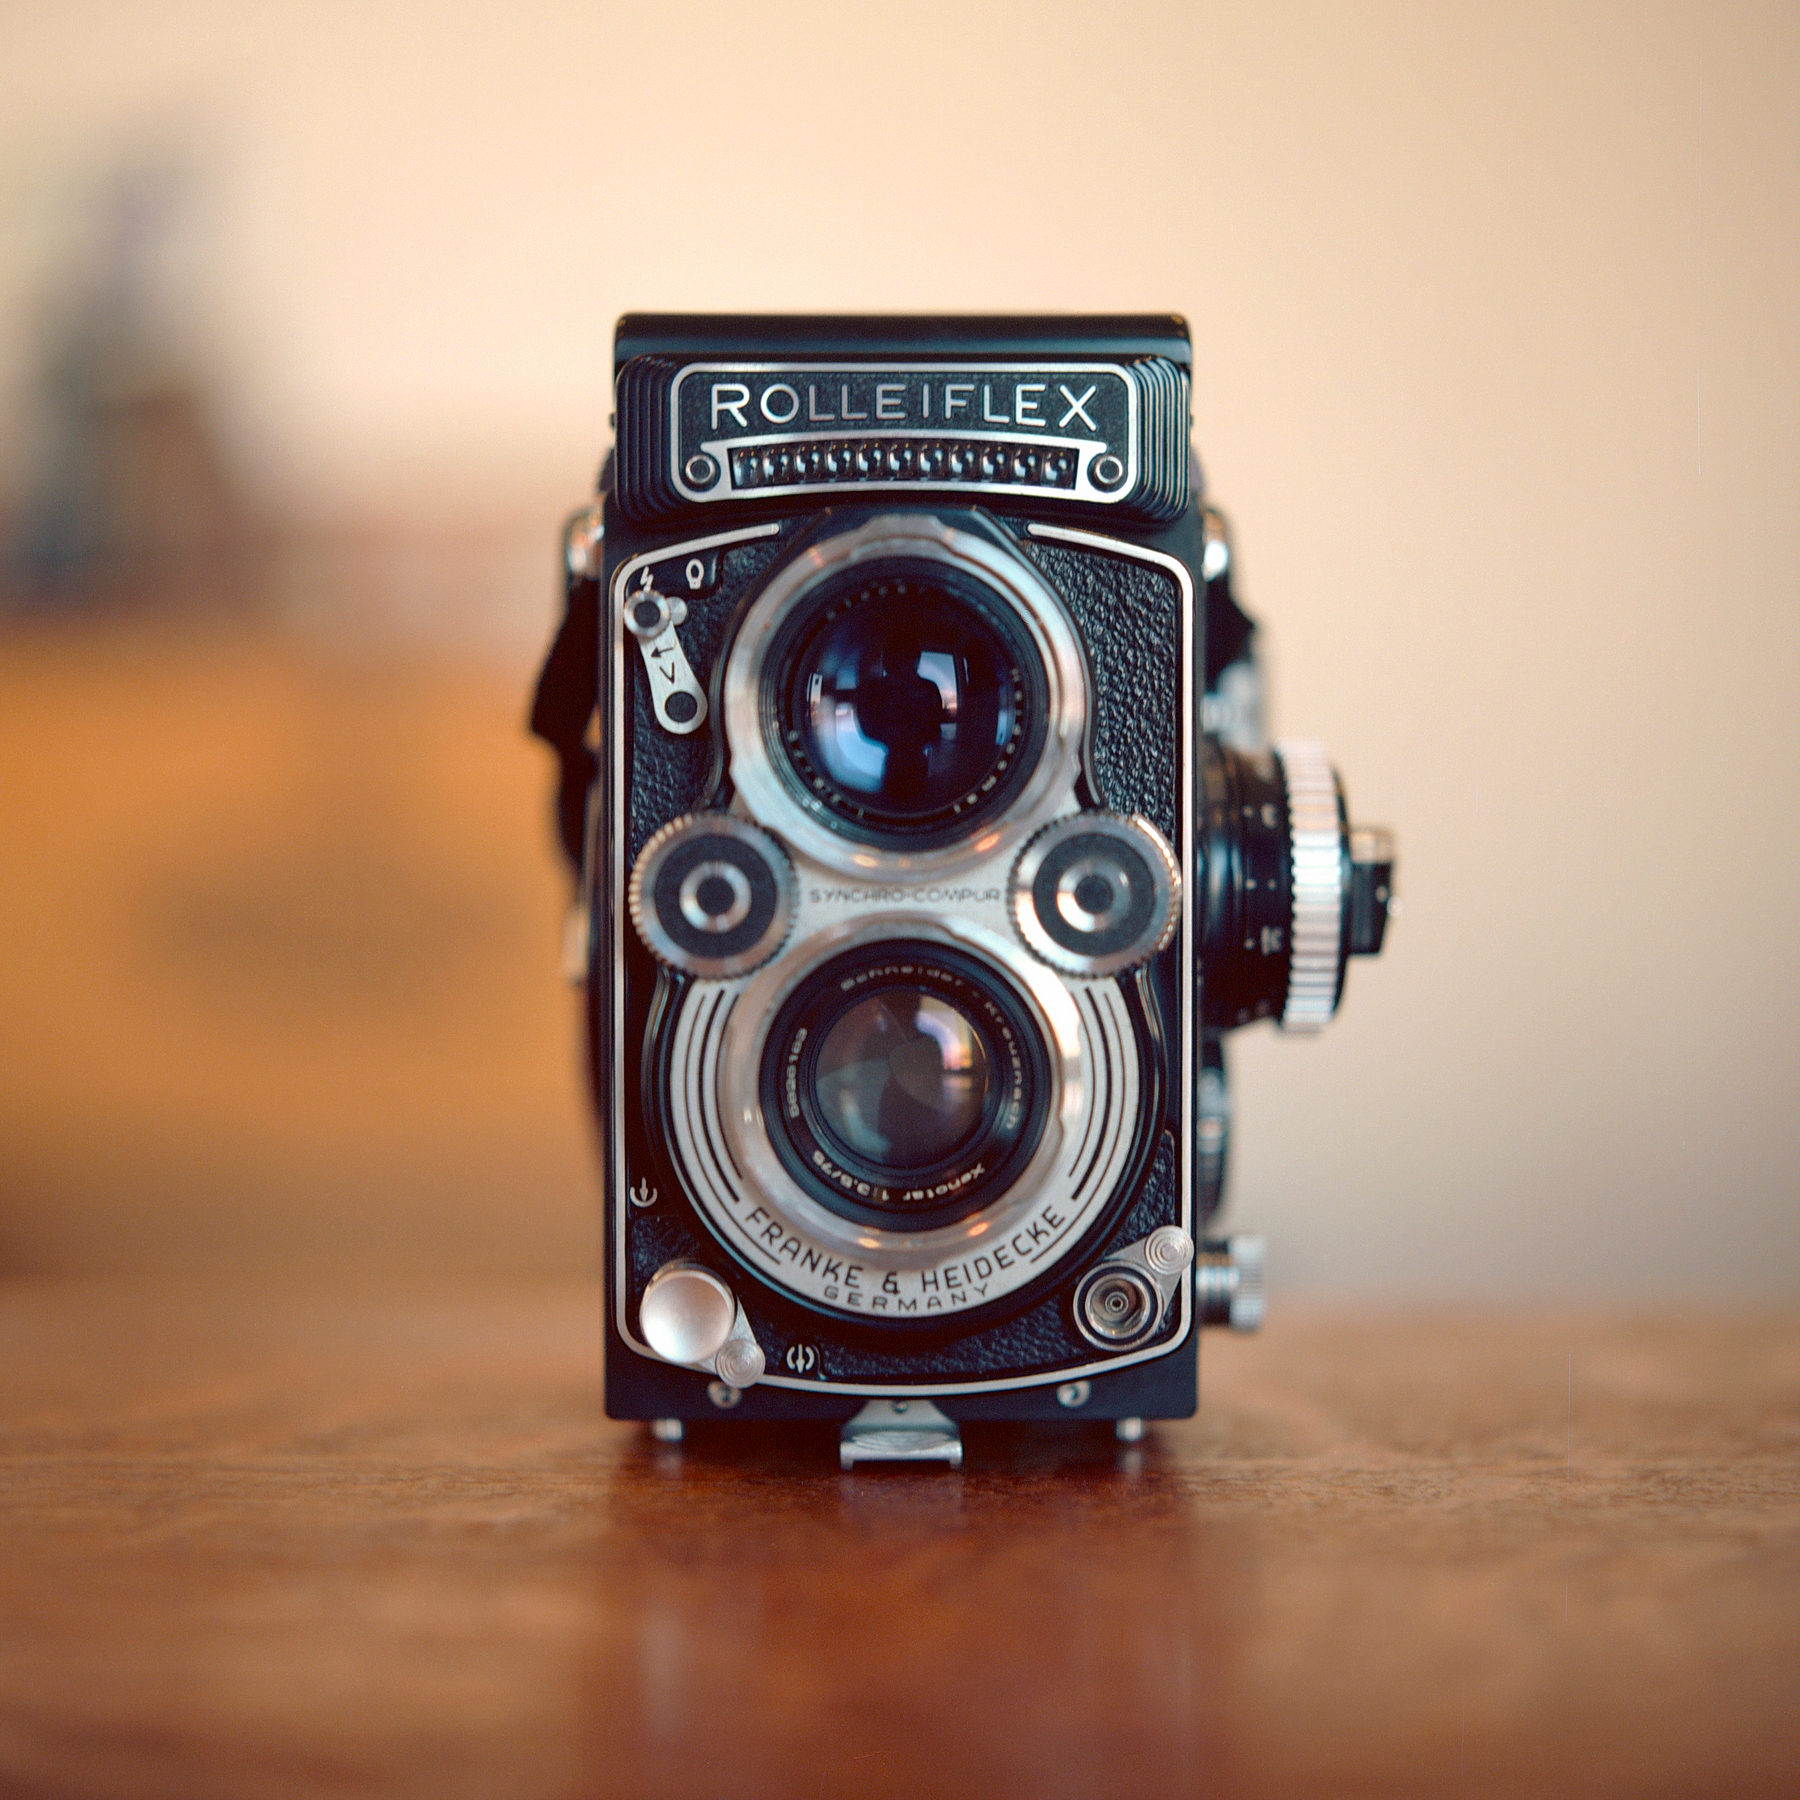
THE STANDARD -
The original Rolleiflex, the Standard was a knob wind TLR with a f/4.5 or f/3.5 Tessar taking lens, manual shutter cocking, and red window frame counter system. Later variants had crank wind with auto stop, but retained the red window for lining up the first frame, as well as automatic shutter cocking with film advance.
THE AUTOMAT -
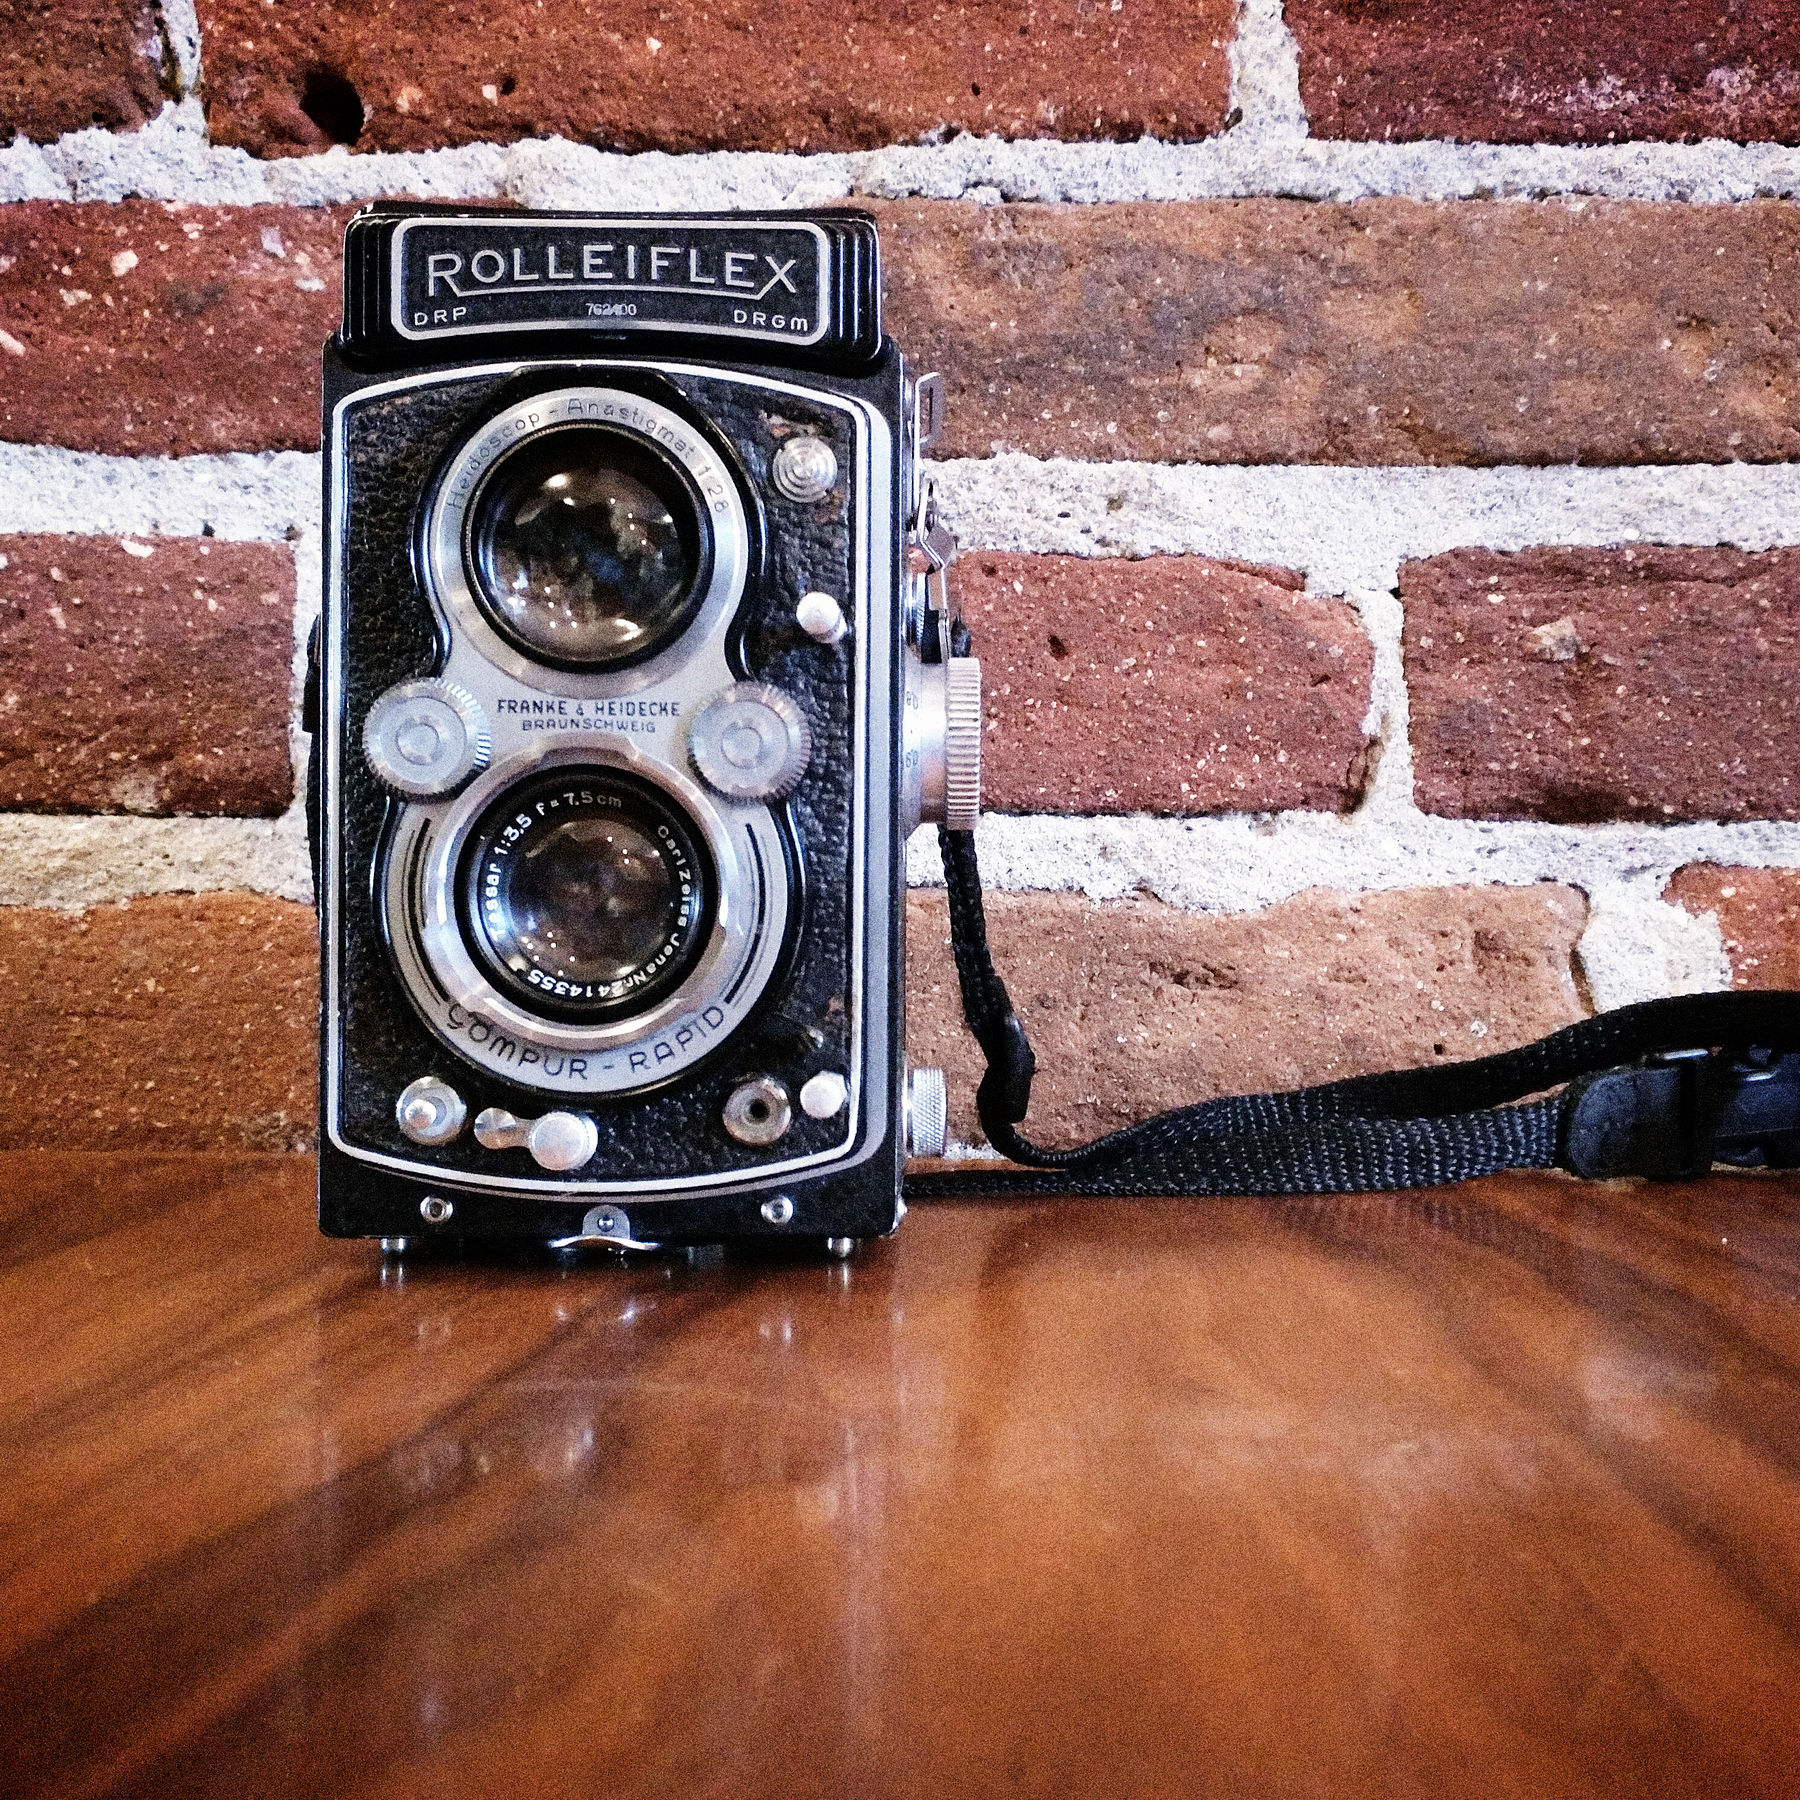
In the late 30s, Franke and Heidecke introduced a new model called the Rolleiflex Automat, which introduced the automatic film loading system that allows you to start the film, close the back, then wind until it stops at the first frame. The Automat came with either a Zeiss Tessar or Schneider Xenar 75mm f/3.5 taking lens, Bay I filter system, and Compur-Rapid shutter with geared dials for adjusting shutter speed and aperture. The Automat also came equipped with a self timer. There are 5 variants of the Automat, with each newer variant came slight improvements. Pre WWII models don't have a filter mount on the viewing lens, and only came with a Zeiss Tessar taking lens. The last variant, generally referred to as MX-EVS, came with an EV lock system which allows you to lock the shutter speed and aperture to a fixed Exposure Value. While locked, if you adjust either the shutter speed or aperture, the other automatically adjusts maintaining the same exposure value. The MX-EVS also came with a new larger focus knob.
THE 2.8 -
In 1949, the first 2.8 model, the 2.8A was released, and each new variant that was released carried the next letter in the alphabet. The 2.8B replaced the 2.8A, and so on. Until the 2.8F though, these model names weren't actually printed or engraved on the camera, so identifying the model can be tricky.
The 2.8A is a bit of an oddity within the group of 2.8 models. It came with a 4 element Tessar f/2.8 taking lens, and a Bay II filter mount that isn't fully compatible with all Bay II accessories. All subsequent 2.8 models use the larger Bay III filter mount.
The 2.8B introduced the 5 element taking lens in the form of the Zeiss Biometar 80mm f/2.8, but it wasn't produced for very long, making it the rarest of the 2.8 cameras and therefore it is usually quite expensive.
The 2.8C introduced both the Zeiss Planar and Schneider Xenotar 5 element taking lenses. This model is identifiable by the black plastic shutter lock and flash socket switch. It was also the last Rolleiflex to use a 10 bladed aperture. All Rolleiflex since have a 5 bladed aperture. The Planar version was produced for less time, so it is less common than the Xenotar version.
The 2.8D is similar to the 2.8C, but has metal shutter lock and flash socket switch, and has the 5 bladed aperture. It was also the last 2.8 model with the classic Rolleiflex nameplate without the meter slot.
The 2.8E was the first 2.8 model with a built in (uncoupled) light meter. The meter reading gave you an EV number which you then set the shutter speed and aperture to. It is identifiable by the selenium meter array just below the Rolleiflex name, the silver meter switch on the upper corner of the nameplate, and the older style focusing hood. The 2.8E was available with Planar or Xenotar taking lens, and was only available with the built in meter.
The 2.8E2 replaced the 2.8E, and was available with or without the built in meter.
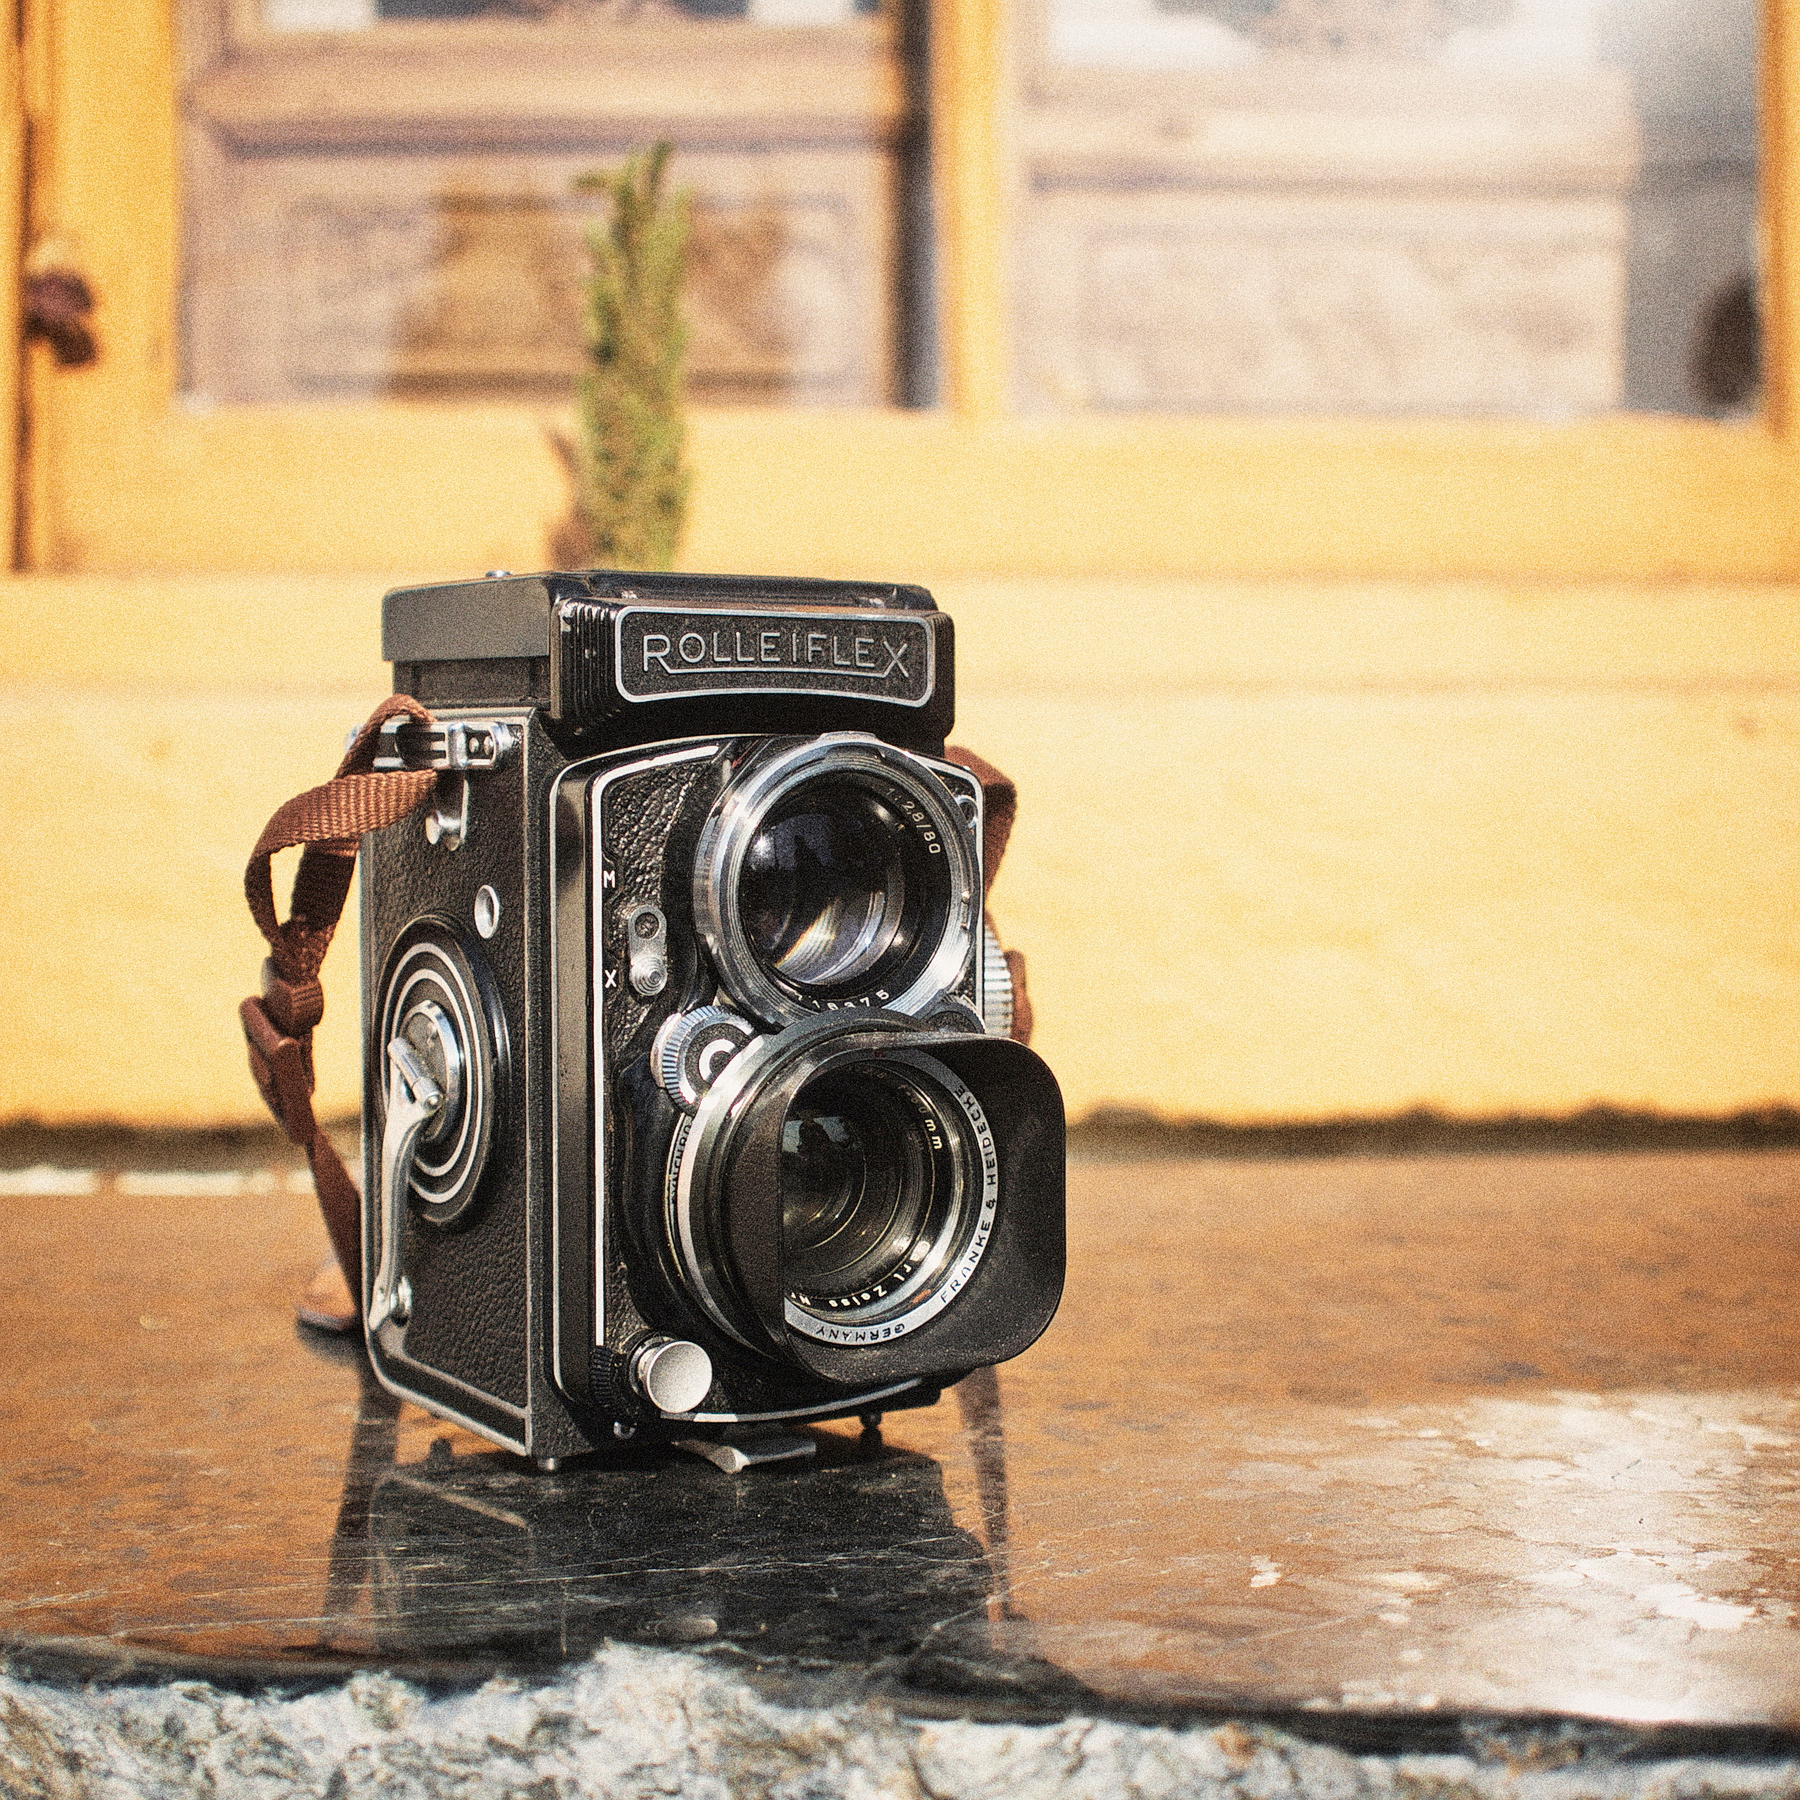
The 2.8F featured a coupled light meter, as well as a new style removable folding focusing hood, with user changeable focus screens. Within the 2.8F range , there are Type 1, 2, 3, and 4 variants. Later variants allow for use of 220 film and have a 12/24 switch for the film transport/frame counter. The 2.8E3 was available alongside the 2.8F (at least until 1965) and was available with or without the built in meter.
THE 3.5 -
In 1956, with the introduction of the 2.8E, Franke and Heidecke also replaced the Automat with the 3.5E. The 3.5E (also known as 3.5C) was the first 3.5 model to feature the newer 5 element Zeiss Planar or Schneider Xenotar 75mm f/3.5 taking lenses. This was also the first 3.5 model to use the Bay II filter mount. It was sold in Europe as the 3.5C, but in the US it was sold as 3.5E. I tend to just call it the 3.5E because it is essentially a f/3.5 version of the 2.8E.
The 3.5E was available with or without the built in meter, and like the 2.8E, the meter is uncoupled.
The 3.5F was the f/3.5 counterpart of the 2.8F, and other than the taking lens and the Bay II filter mount, it basically shared the same features and followed the same progression as the 2.8F and its variants.
The 3.5E2 and 3.5E3 were sold concurrently with the 3.5F, and both were available with or without the built in meter.
THE ROLLEIFLEX T -
This is a model that doesn’t really fit into any other group. About 2 years after the 3.5E replaced the Automat, Franke and Heidecke released a new budget model in the form of the Rolleiflex T. It came standard with a 4 element Tessar taking lens. The newer removable folding focusing hood with changeable focus screens, and a crank wind like other Rolleiflex, but a lever for changing shutter speed and aperture like those found on a Rolleicord. It also was available with or without a built in meter. Despite it being a more budget friendly model, it is still a superb camera, and interestingly it seems to sell for around as much as a similar condition type 1 3.5F.
FILTER MOUNTS -
Actually, a good way to break down the various Rolleiflex models into groups, is to sort them by filter mounts. This is also a good thing to think about if you’re thinking about buying a Rolleiflex. Bay I accessories are fairly plentiful and generally inexpensive, Bay II accessories are more expensive, and finally Bay III accessories can be hard to find and quite expensive. For example, a Bay I Rolleinar close-up filter might cost around $50, but a Bay III Rolleinar could cost $150 or more.
Bay I cameras are basically all the 3.5 models with 4 element taking lenses.
Bay II cameras are all the Planar or Xenotar equipped 3.5 models, plus the Tessar equipped 2.8A.
Bay III cameras are all the 2.8 models, except the 2.8A
LENSES -
I’ve heard it said that there isn’t a bad lens choice in any Rolleiflex, and from what I have seen, that is true. Especially within the same model range, one lens isn’t any better than another. A Xenar equipped Automat will provide images nearly indistinguishable in quality with images from a Tessar equipped Automat, and likewise, a Planar equipped 2.8 won’t really perform better than a Xenotar equipped 2.8. In general though, a Planar or Xenotar should perform better than a Tessar or Xenar, especially wide open. My experience with my 2.8C Planar and 3.5F Xenotar is that the 3.5 Xenotar is a sharper lens while the 2.8 Planar has better character. I strongly suspect that has more to do with the difference of the 3.5 vs 2.8 than Planar vs Xenotar.
CHOOSING THE RIGHT ROLLIFLEX -
Honestly, you can’t really go wrong with any model of Rolleiflex, assuming it’s in good working condition. I recommend first deciding on a budget and/or features you really want. Do you need f/2.8? Is a working light meter really important? Are user changeable focus screens a must have?
In shopping for a used Rolleiflex, there are some things you want to be aware of. These cameras are now anywhere from 50-80+ years old, and time and use can take their toll. It isn’t uncommon to run across Rolleiflex with haze and/or fungus in the taking and viewing lenses, as well as element separation (breakdown in the glue used to cement lens groups together). Many cameras have seen a lot of use and potentially have worn out film transport mechanisms. Most of these problems can be repaired, but you want to be aware of any issues before buying, and the price should reflect any issues. I recommend buying from a reputable camera shop that tests what they sell and offers a warranty, or really doing your homework on any camera and seller online.
Connect
Film photographer, Colton Allen is based in Oregon. Connect with him on Flickr, Instagram, and Facebook. You can also see more of his work right here on our website.